 Stepsmith
User guide
How to use Stepsmith
Everything Stepsmith can do, in 18 steps. This is the same guide that opens in the app the first time you run it, and it was made with Stepsmith: every screenshot below is a step with its own highlights, arrows and spotlights.
- 1
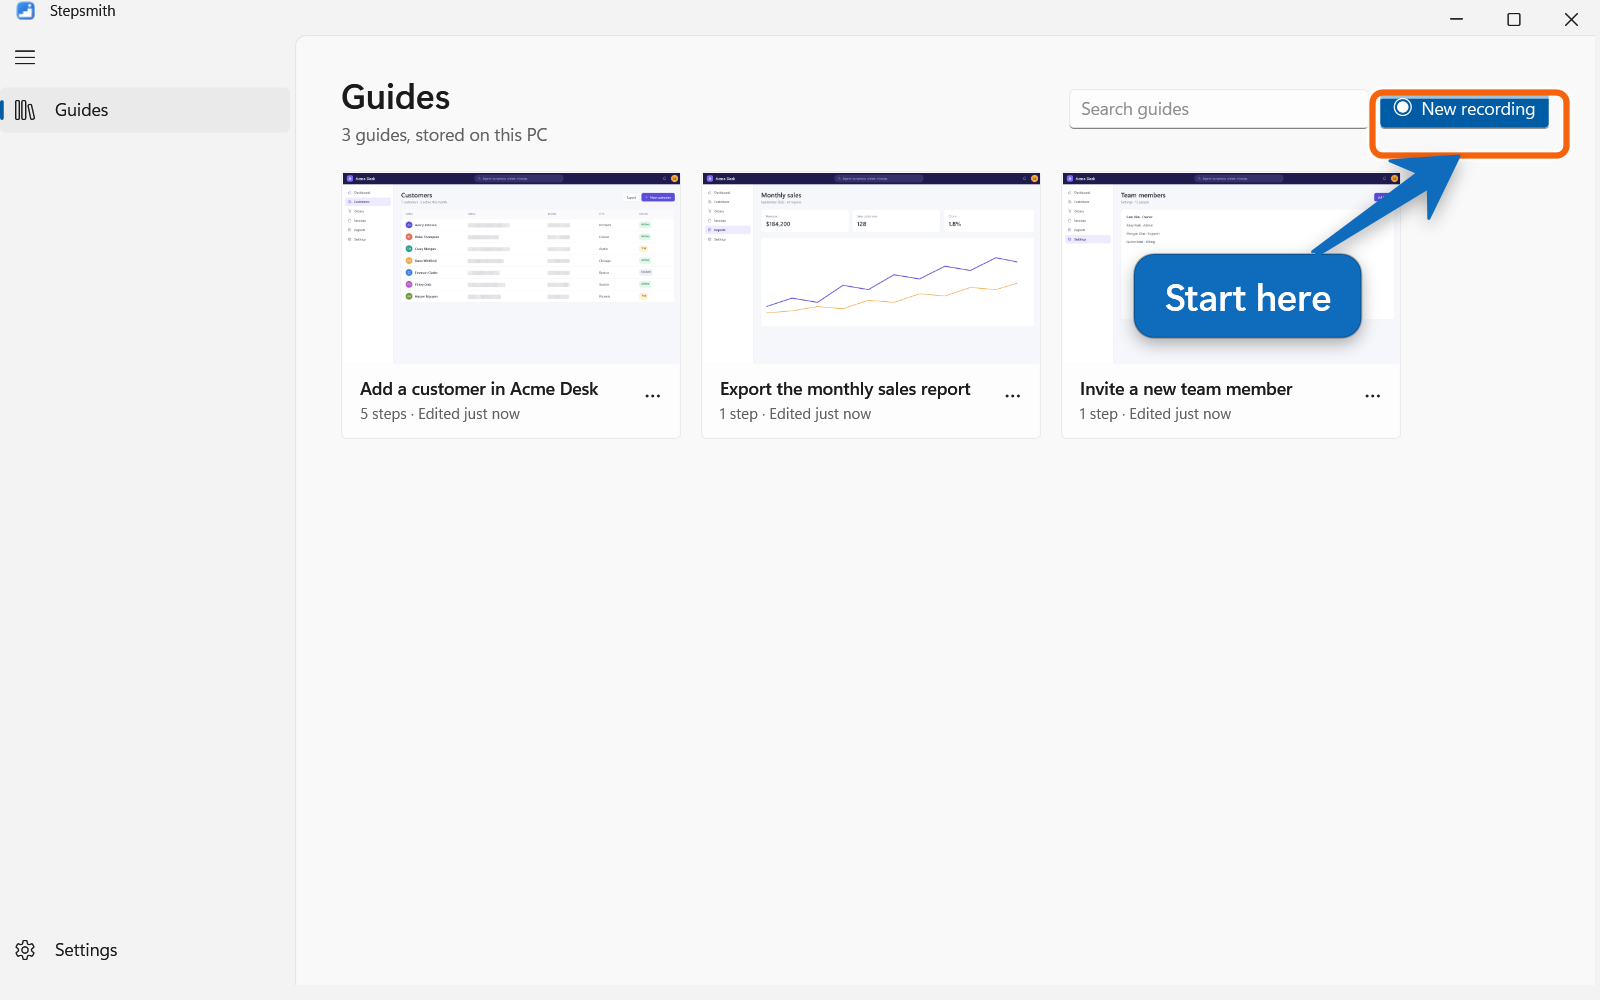
Click “New recording” to start
Stepsmith turns a task you do once into a step-by-step guide. Start a recording from the Guides page, then do the task as you normally would.
Everything is recorded and stored on this PC. Nothing is uploaded, and no account is needed.
Tip
While recording, Ctrl+Shift+F9 pauses and Ctrl+Shift+F10 finishes, so you never have to reach for the toolbar.
- 2
Do the task as usual
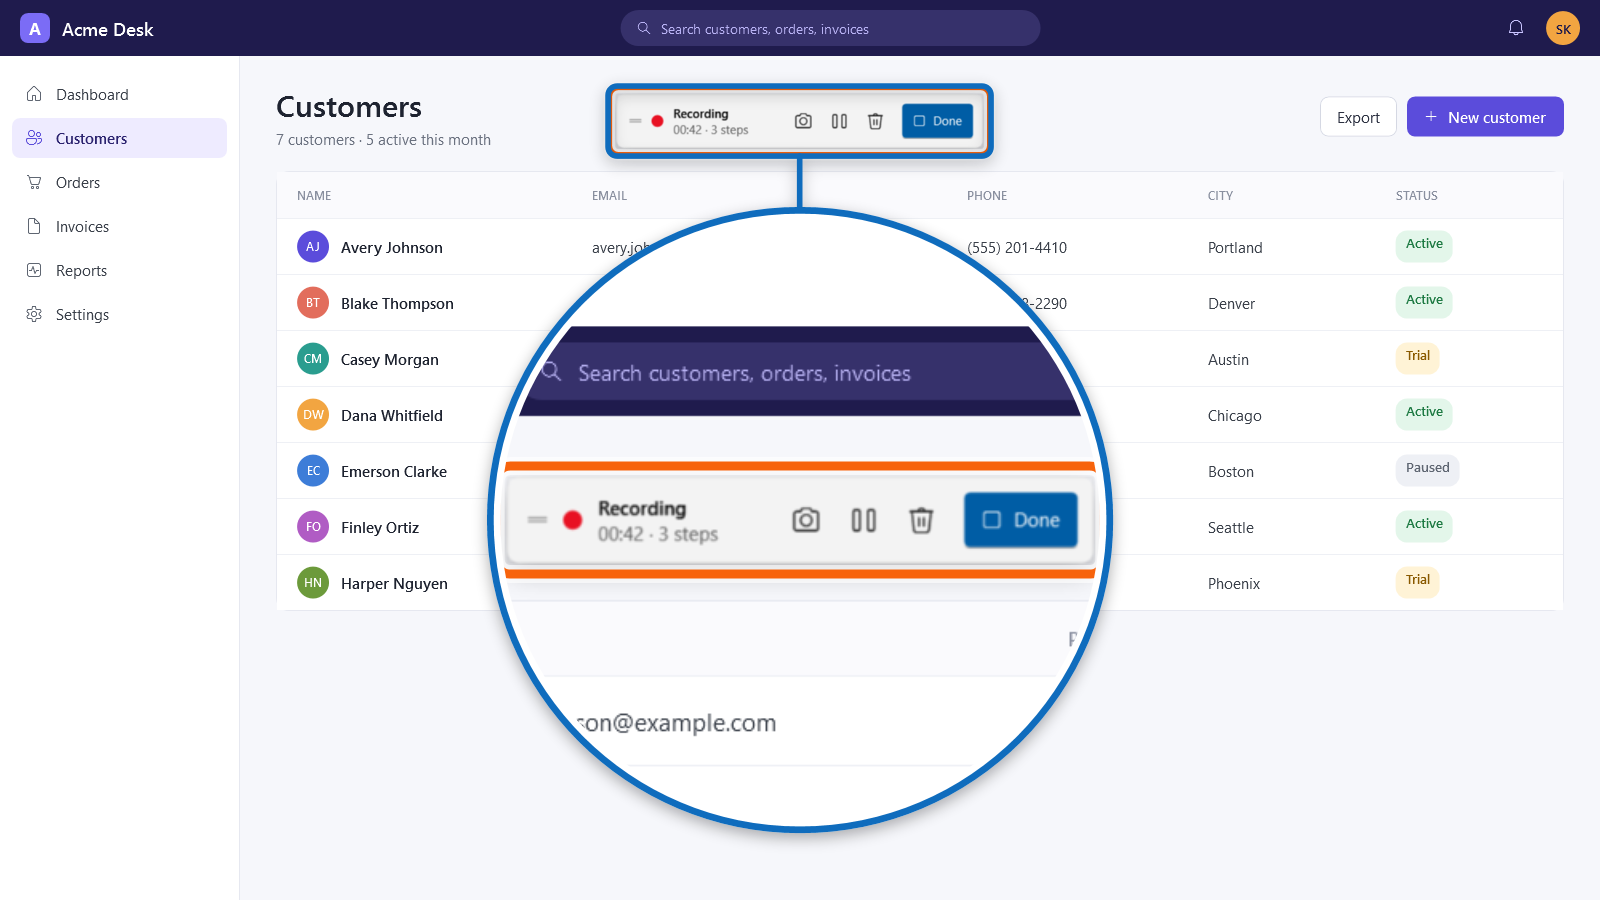
A small toolbar shows how long you've been recording and how many steps there are. Pause it while you do something that shouldn't be in the guide, discard the recording to start over, or click Done to review it.
Every click becomes a step with a screenshot. Typing into a box becomes one step, and shortcuts such as Ctrl+S become steps too. The toolbar never appears in your screenshots.
To show something that disappears when you click, like a menu that opens on hover or a tooltip, press Ctrl+Shift+F8: the screen is captured as a step without a click. The camera button on the toolbar does the same after 3 seconds, so you can open the menu first.
Info
Text typed into password fields is never recorded. If you type an email address or a card number elsewhere, the step says so without showing it.
- 3
Each click becomes a written step
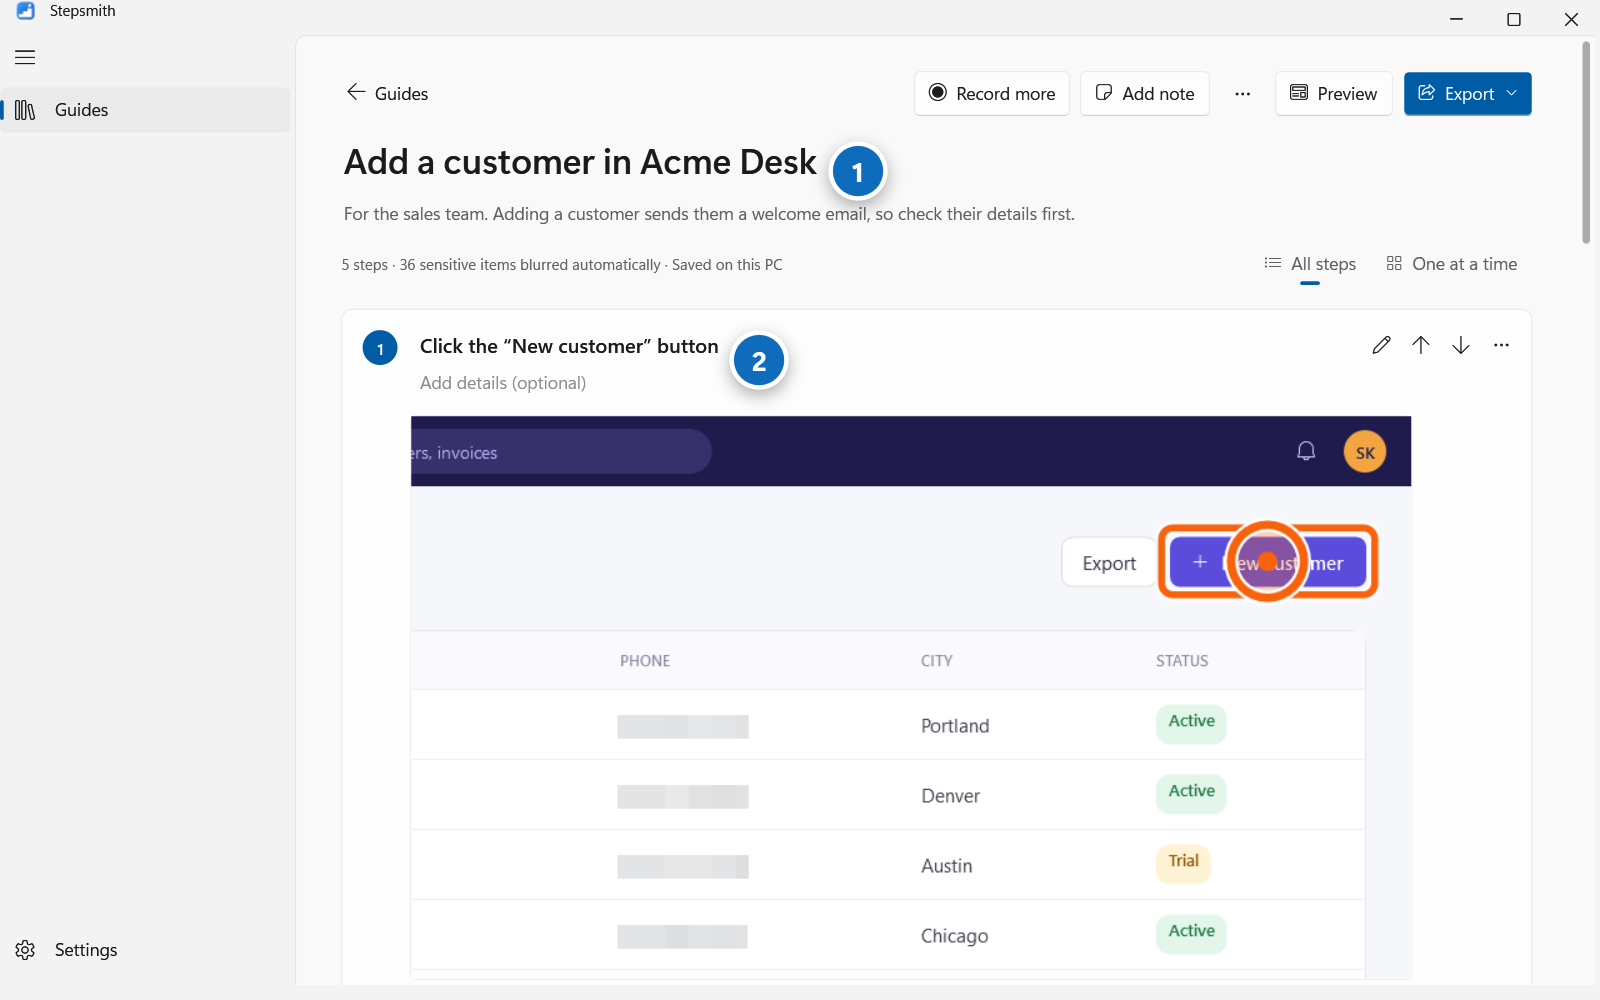
When you finish, the guide opens in the editor. Stepsmith writes each step for you, such as Click the “New customer” button, using the names Windows reports for buttons and boxes. No AI or internet connection is involved.
Click the guide's title (1) or any step's title or details (2) to change them, and add an introduction under the title. Everything saves automatically.
Tip
Missed something? Record more adds new steps to the end of the same guide, and Add note adds a written step without a screenshot.
- 4
Use the step menu for everything else
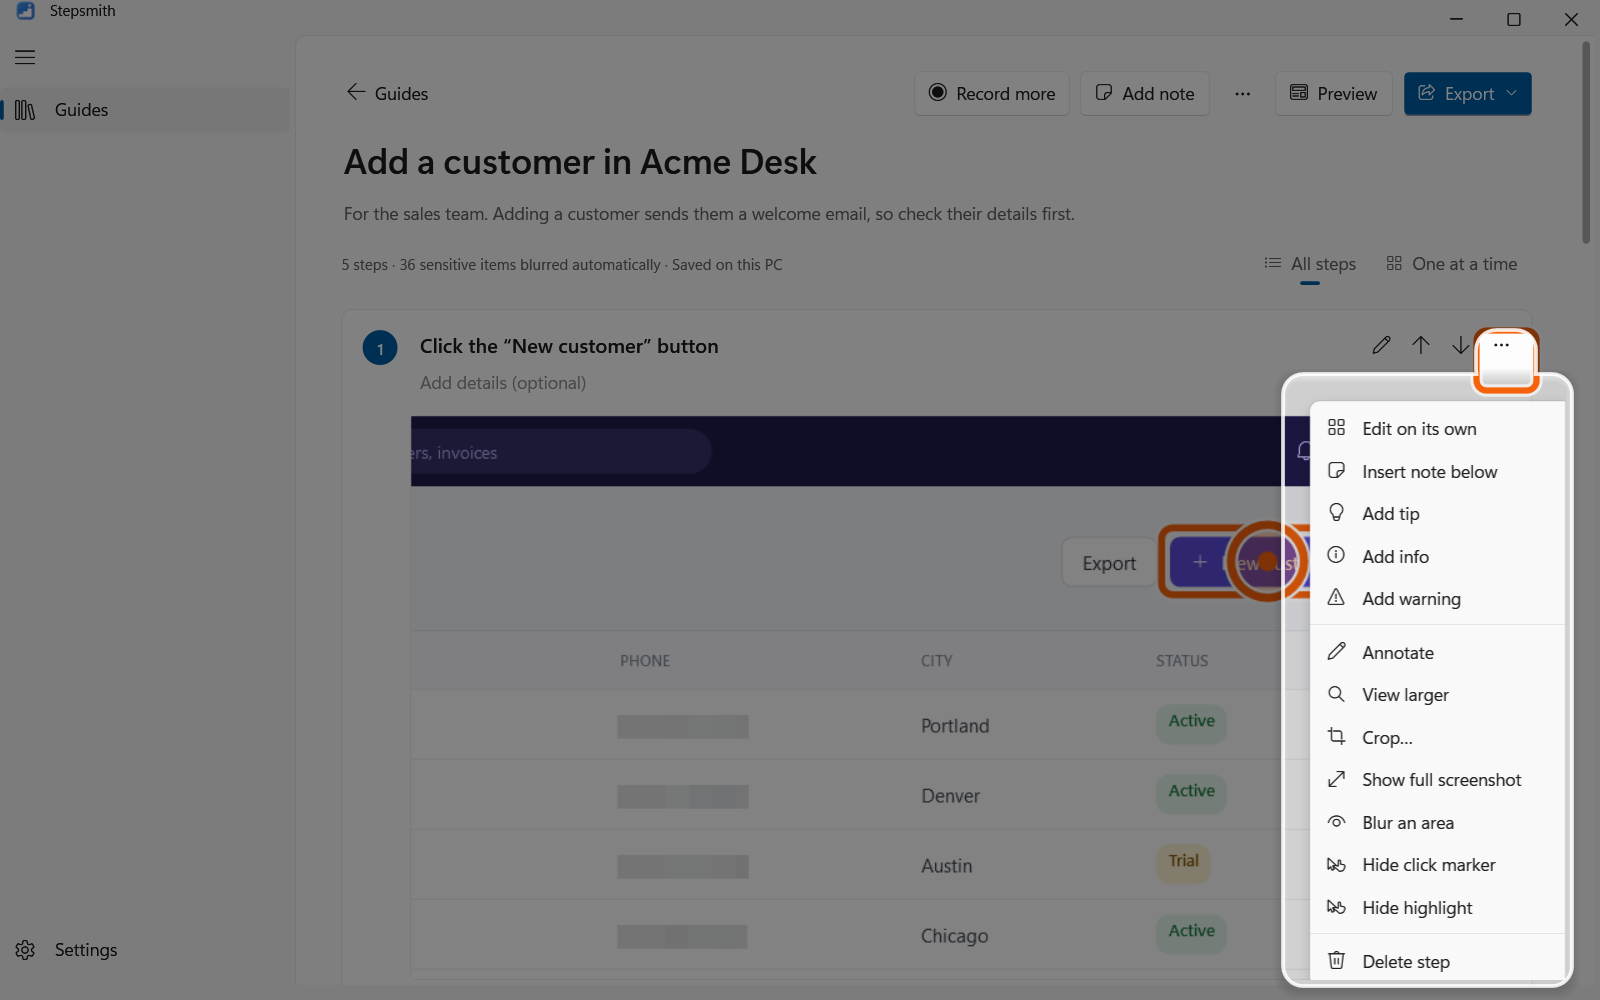
Each step's ··· button opens its options:
- Edit on its own, or insert a note below it
- Add a tip, info or warning
- Annotate, or view the screenshot larger
- Crop, zoom in on the click, or show the full screenshot
- Blur an area, and show or hide the click marker and highlight
- Delete the step, with Undo
The arrows beside it move a step up or down.
- 5
Add tips, info and warnings
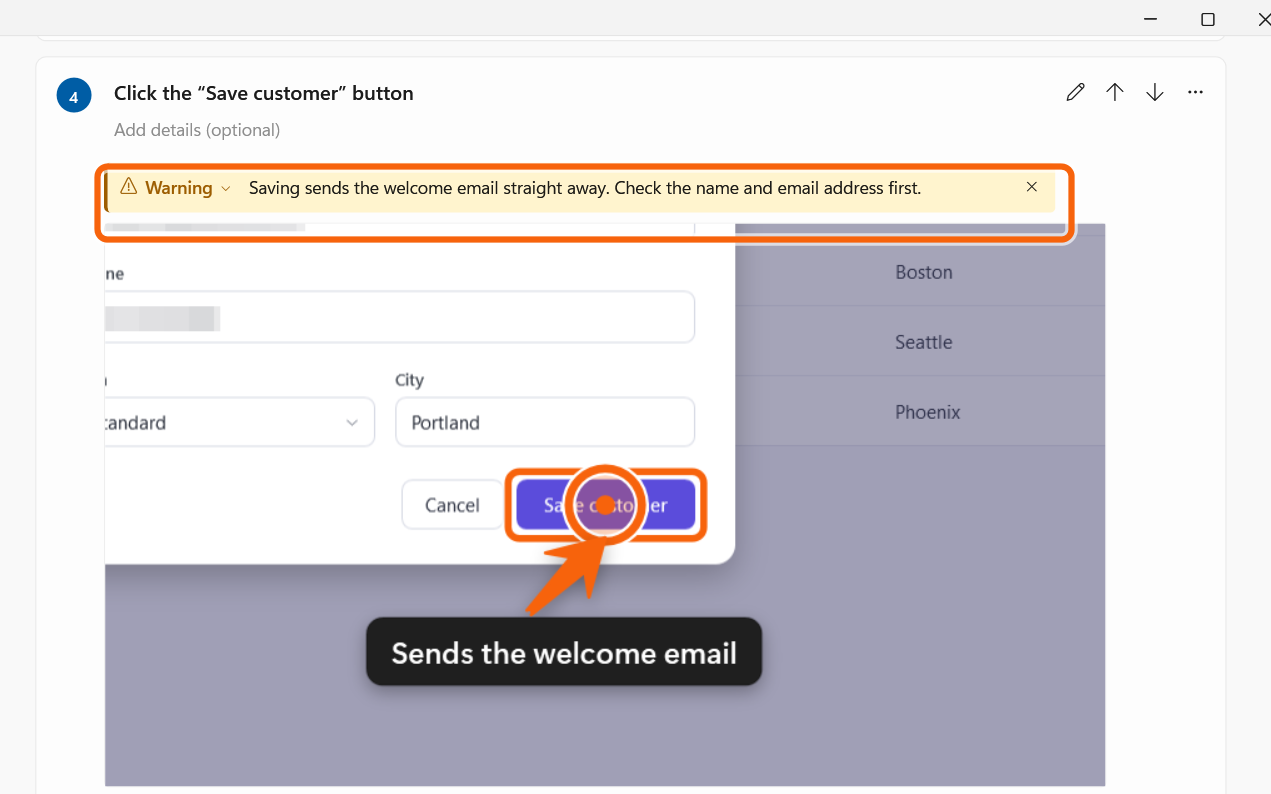
Callouts draw attention to what matters: a shortcut, some background, or something that could go wrong. Add one from the step menu, type the text, then click the check button or press Ctrl+Enter. Click its label to switch between Tip, Info and Warning.
Callouts appear in every export, in the same colors.
Warning
Warnings appear before the screenshot, so readers see them before they click.
- 6
Sensitive information is blurred for you
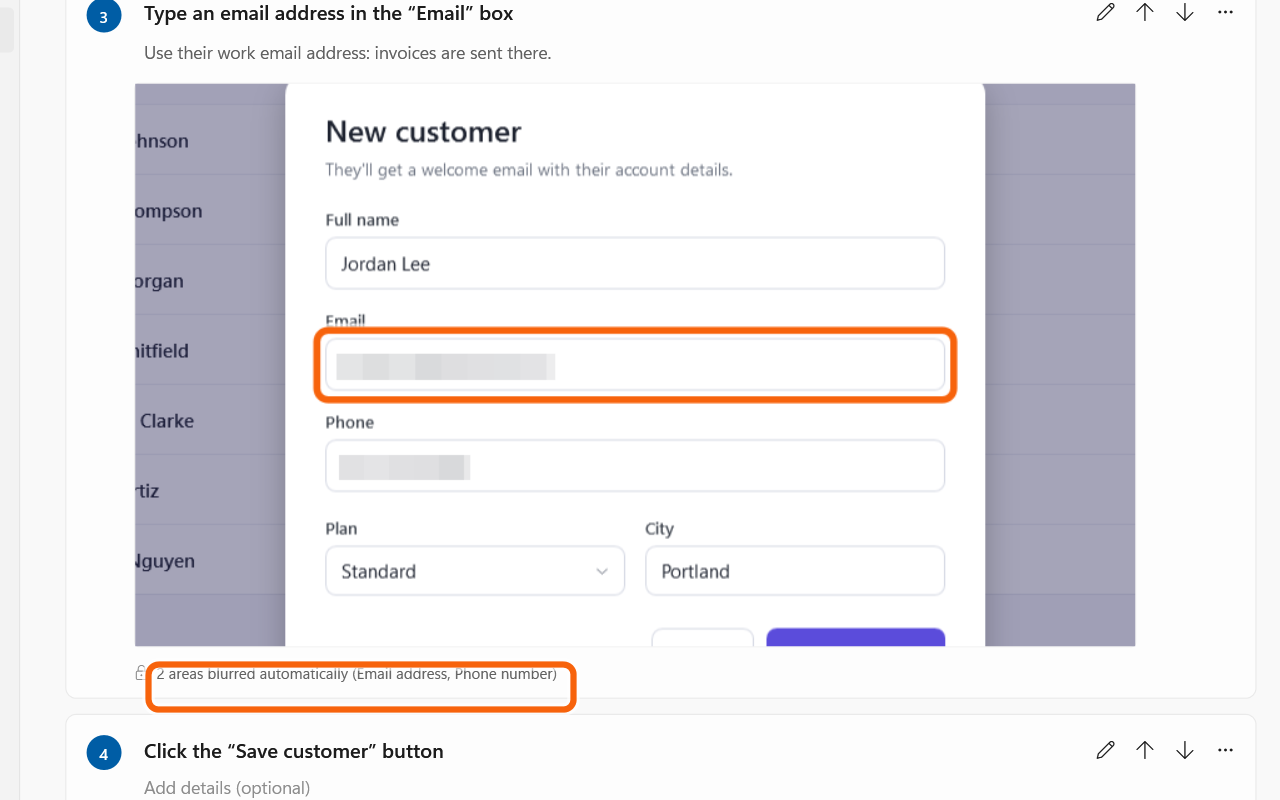
As each screenshot is taken, Stepsmith reads its text with Windows' built-in text recognition and blurs email addresses, phone numbers, card numbers, bank accounts, IP addresses and ID numbers before the image is saved. The original pixels never reach the disk.
To hide anything else, choose Blur an area from the step menu and drag over it.
Info
Text recognition can miss things, such as unusual fonts or very small text. Always check screenshots before you share a guide.
- 7
Click a screenshot to see it full-window
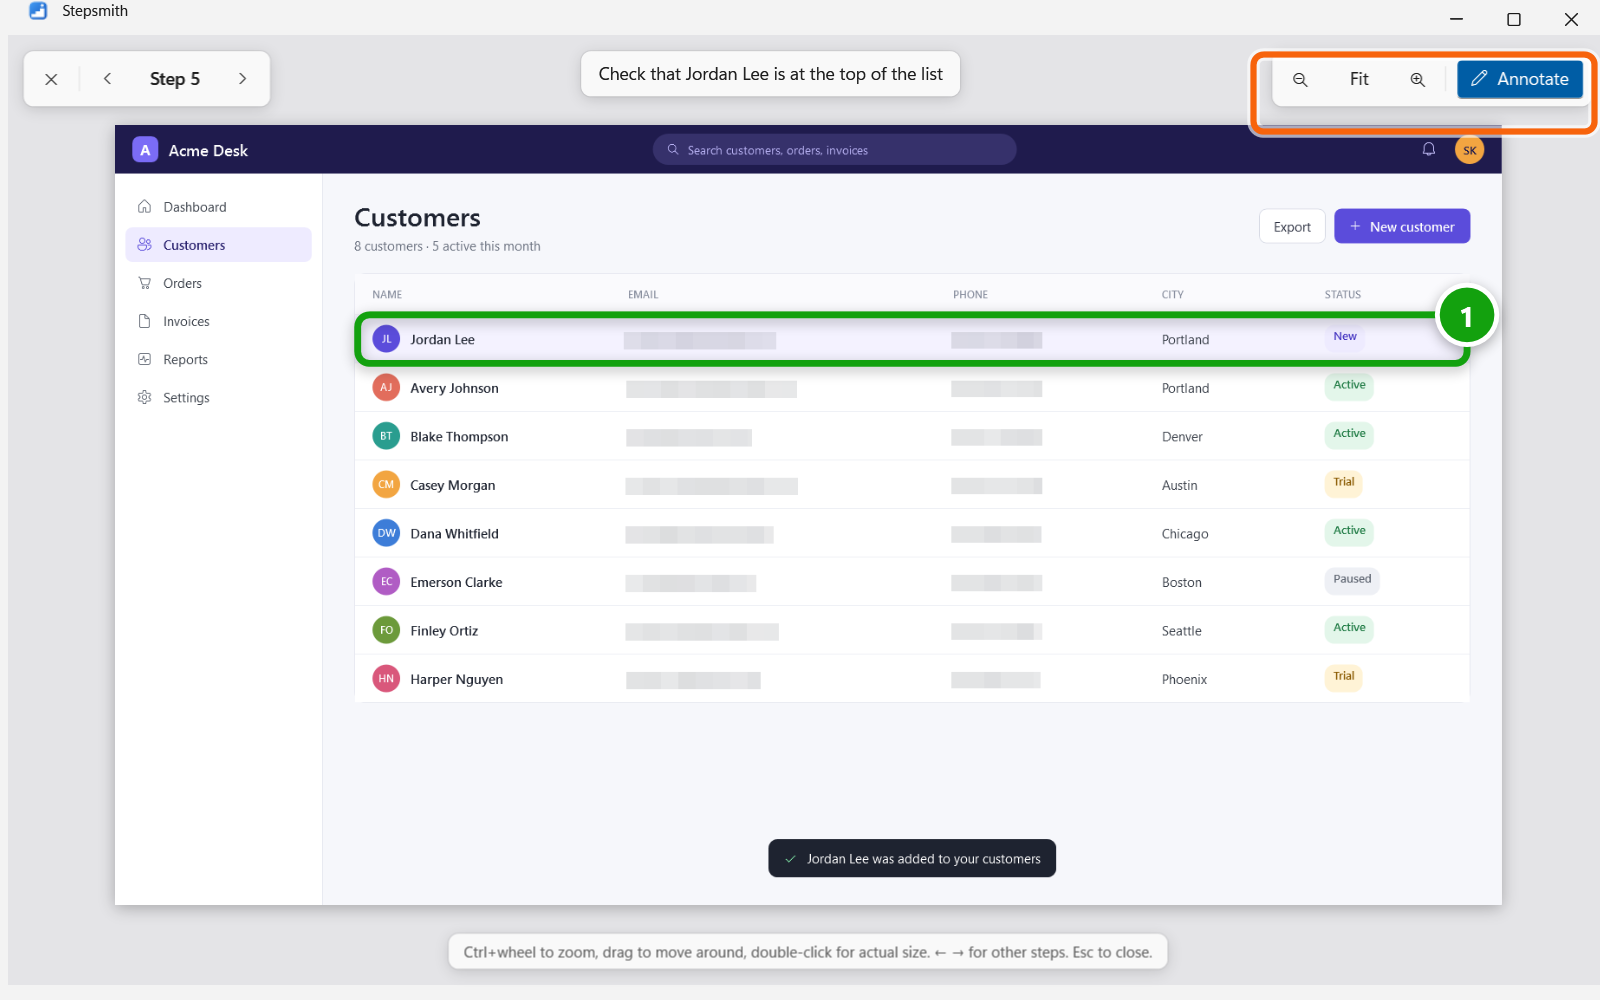
Full-screen captures can be hard to read in a list, so click any screenshot to open it full-window:
- Ctrl+mouse wheel, or the + and - buttons, to zoom
- Ctrl+0 fits the window, Ctrl+1 shows actual size, or double-click
- Drag to move around a zoomed screenshot
- Left and Right arrow keys go to the previous or next step
- Esc closes the viewer
- 8
Annotate with arrows, boxes and text
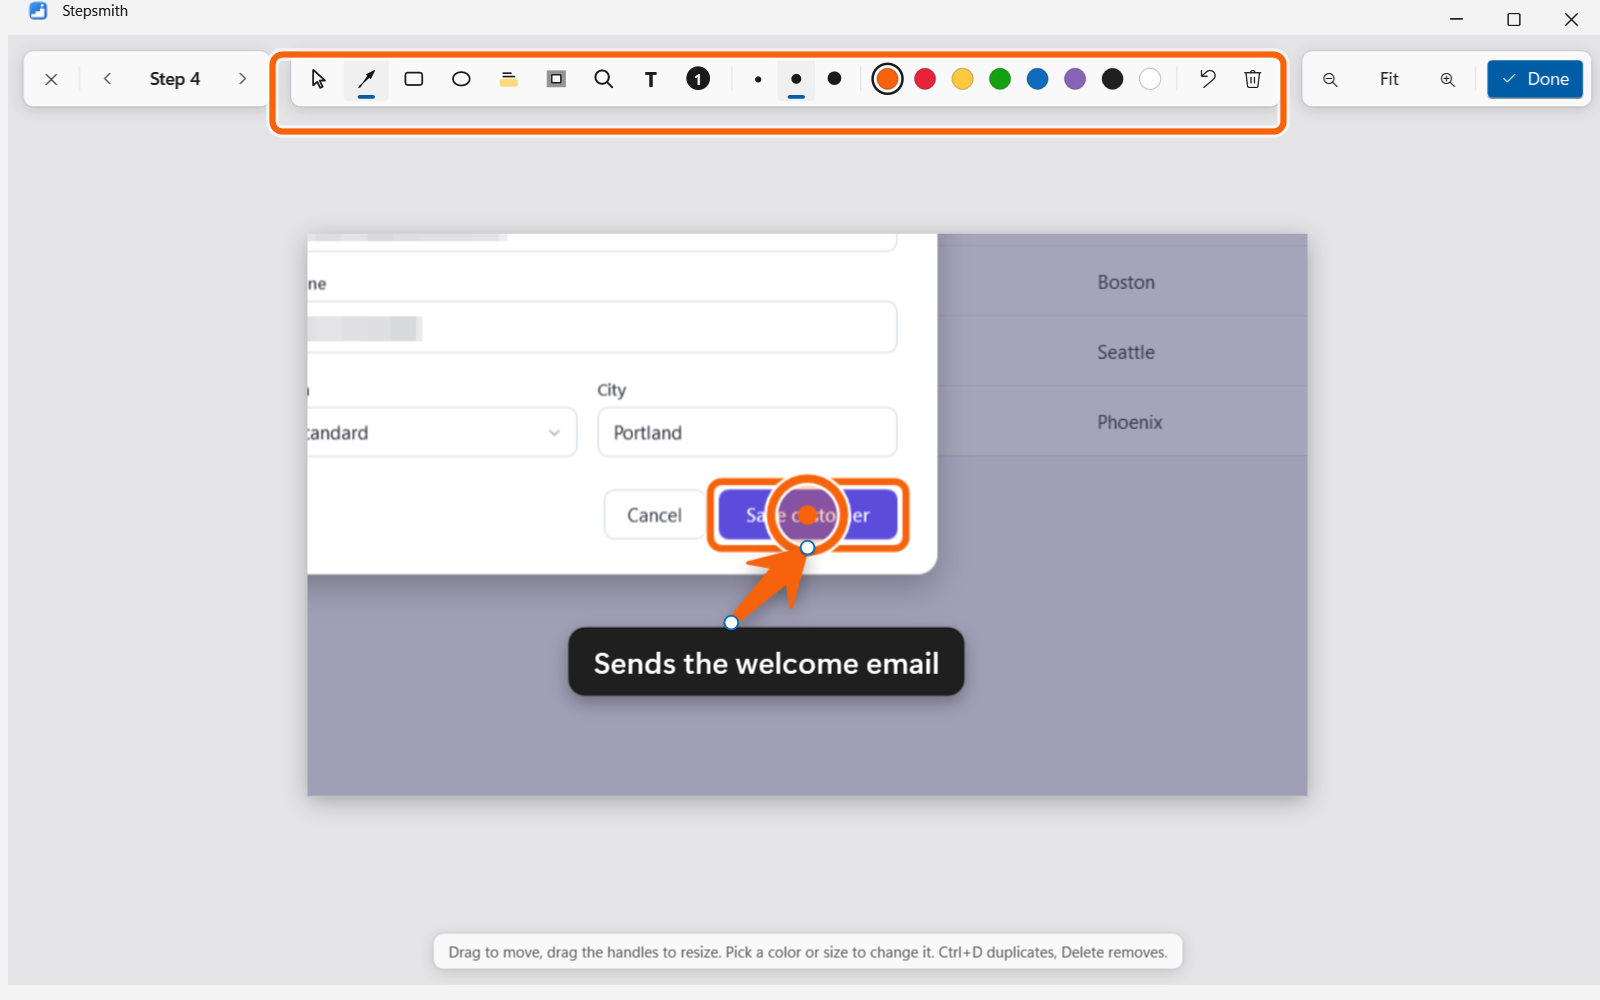
Click Annotate in the viewer, or the pencil button on a step, to draw on its screenshot. Pick a tool, size and color from the toolbar:
- Select (V), Arrow (A), Box (R), Ellipse (E), Highlighter (H)
- Spotlight (S), Magnifier (M), Text (T), Numbered badge (N)
- Small, medium and large: 1, 2 and 3
A new mark is selected straight away: drag it to move it, drag its handles to reshape it, or pick another color or size. Shift keeps boxes square and arrows straight. Ctrl+D duplicates, Delete removes and Ctrl+Z undoes. Hold Space and drag to move around while zoomed in.
- 9
Spotlight and magnify what matters
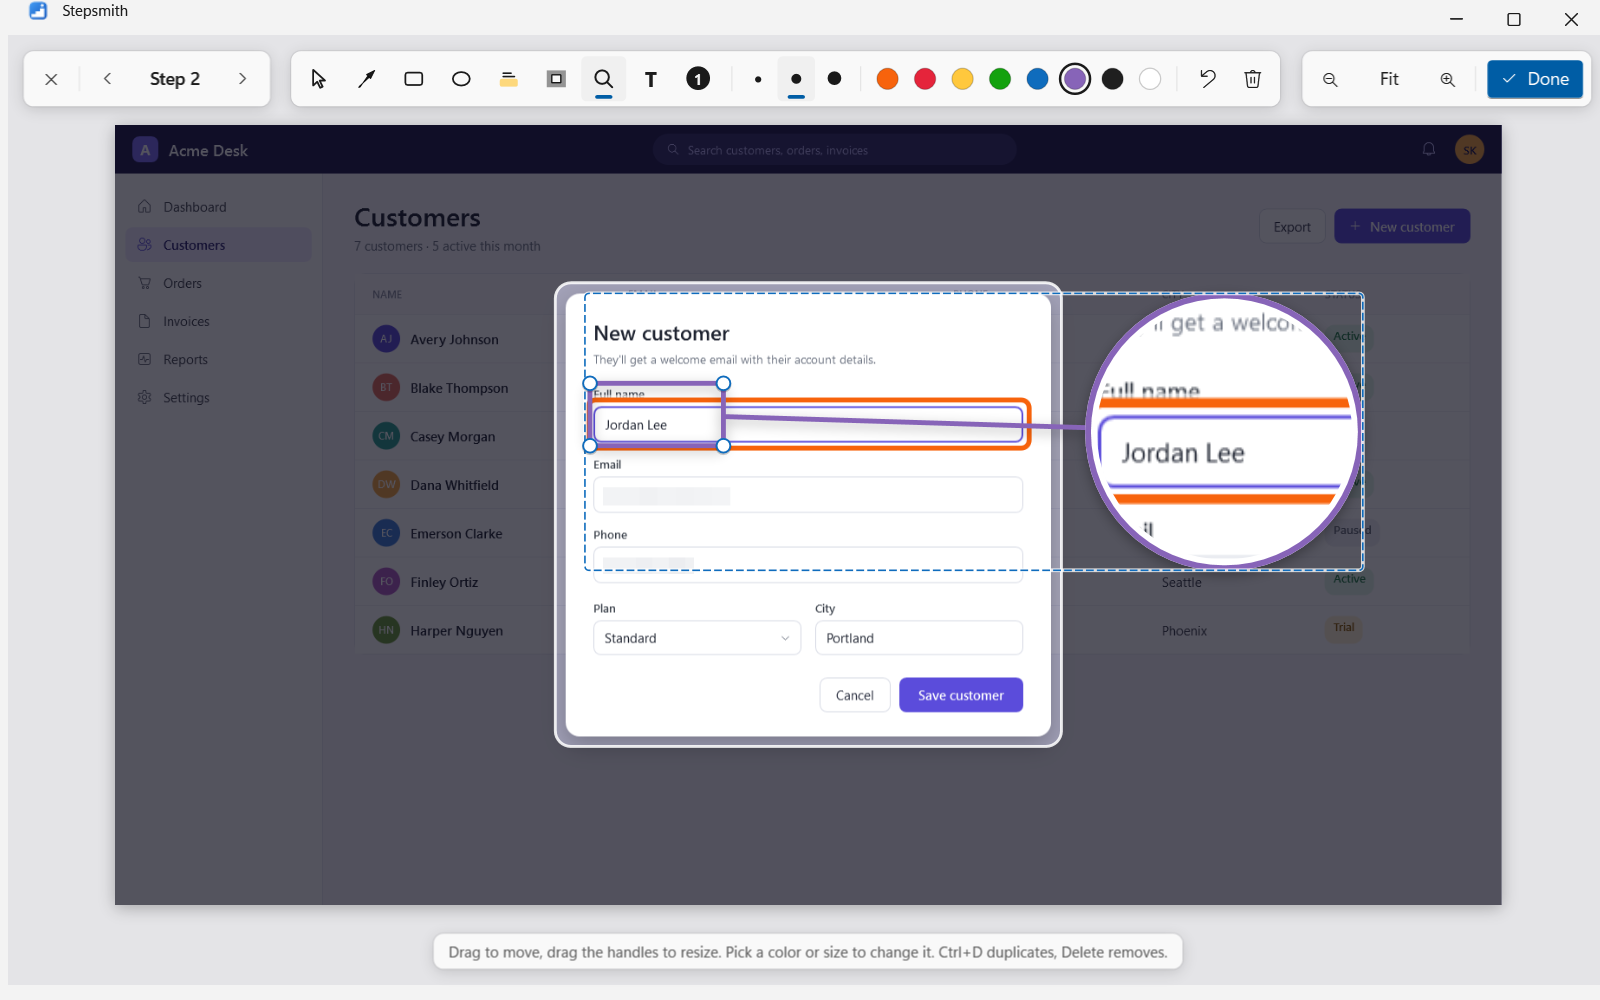
Spotlight dims everything except the area you drag over, so readers' eyes go straight to it. Magnifier shows a small area enlarged in a round lens: drag over a button or a box, then drag the lens wherever there's room.
Both work well on full-screen screenshots, where the part that matters is small. Like every mark, they appear in exports exactly as you see them here.
- 10
Crop, or zoom in on the click
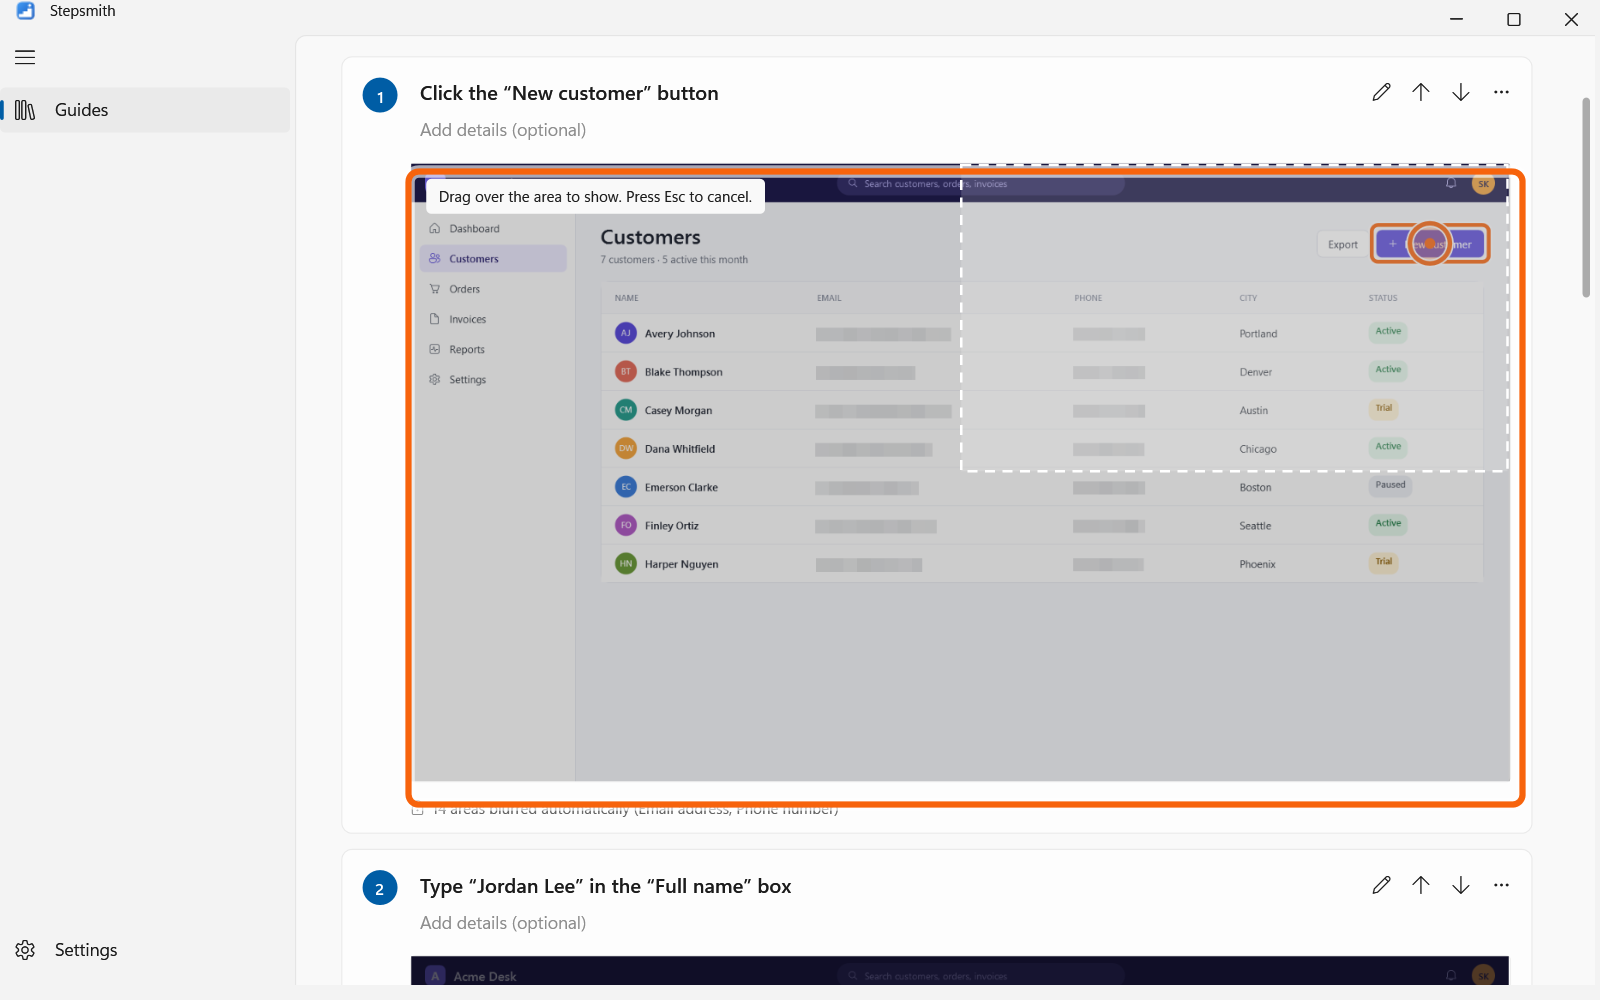
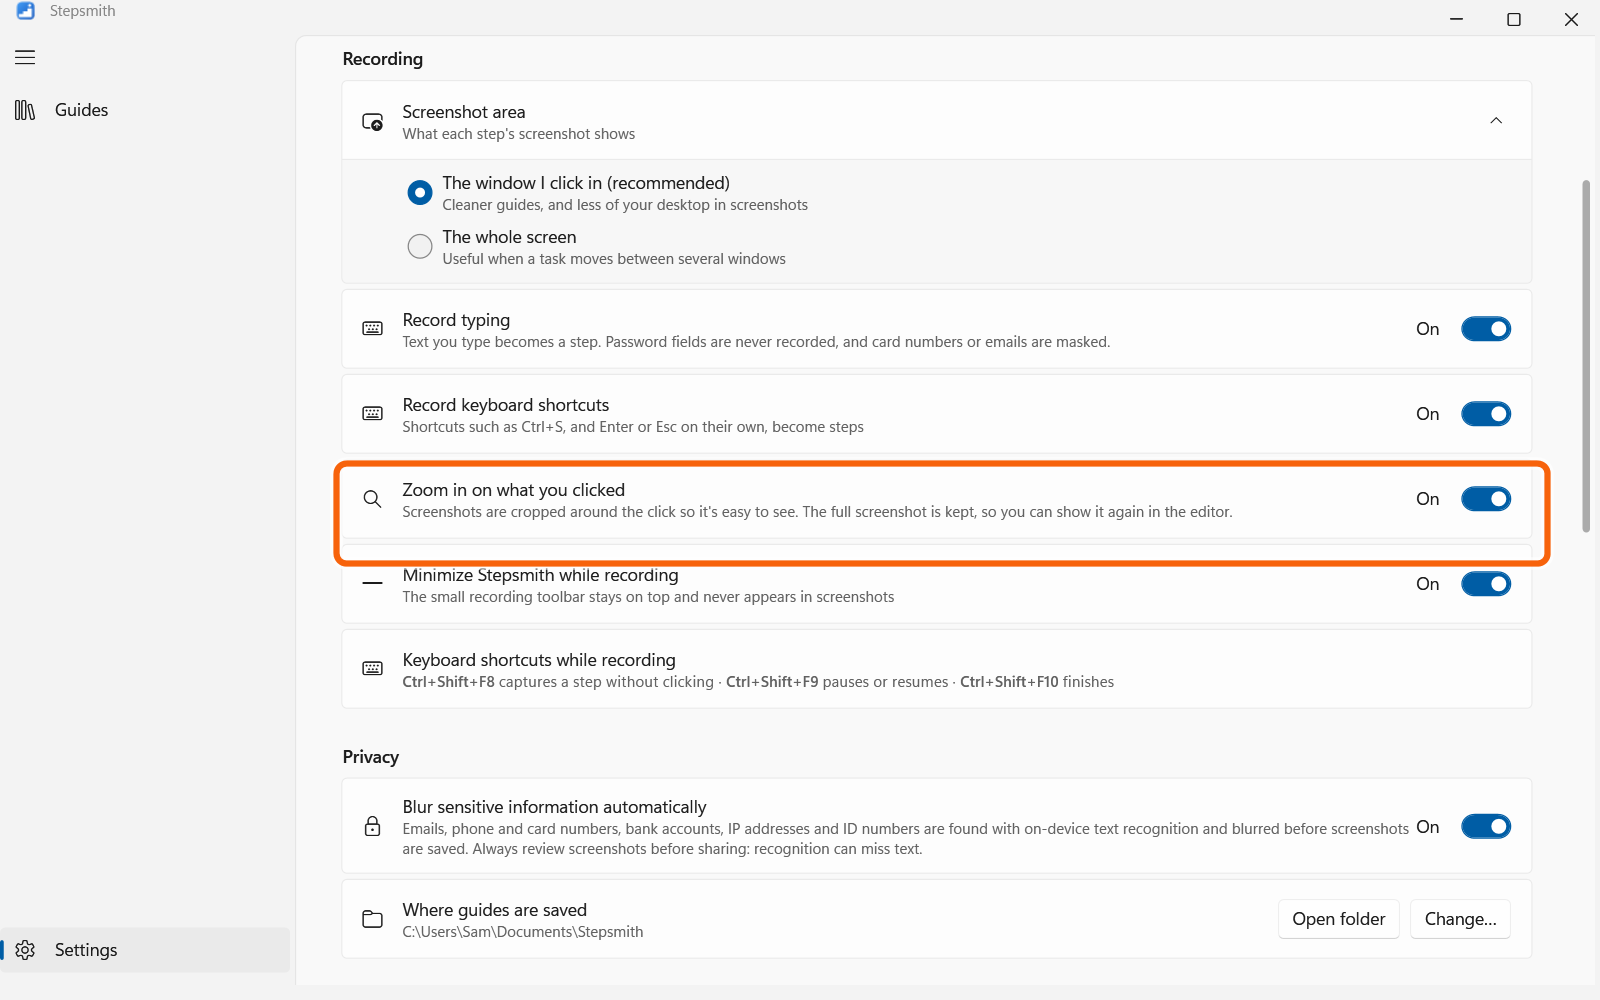
New recordings zoom in on what you clicked, so the important part is large in the guide. The full screenshot is always kept, so nothing is lost.
From the step menu, choose Crop and drag over the area to show, Zoom in on the click, or Show full screenshot. The ··· button next to Export does the same for every step at once.
Tip
Turn automatic zoom on or off in Settings, under Recording.
- 11
Focus on one step at a time
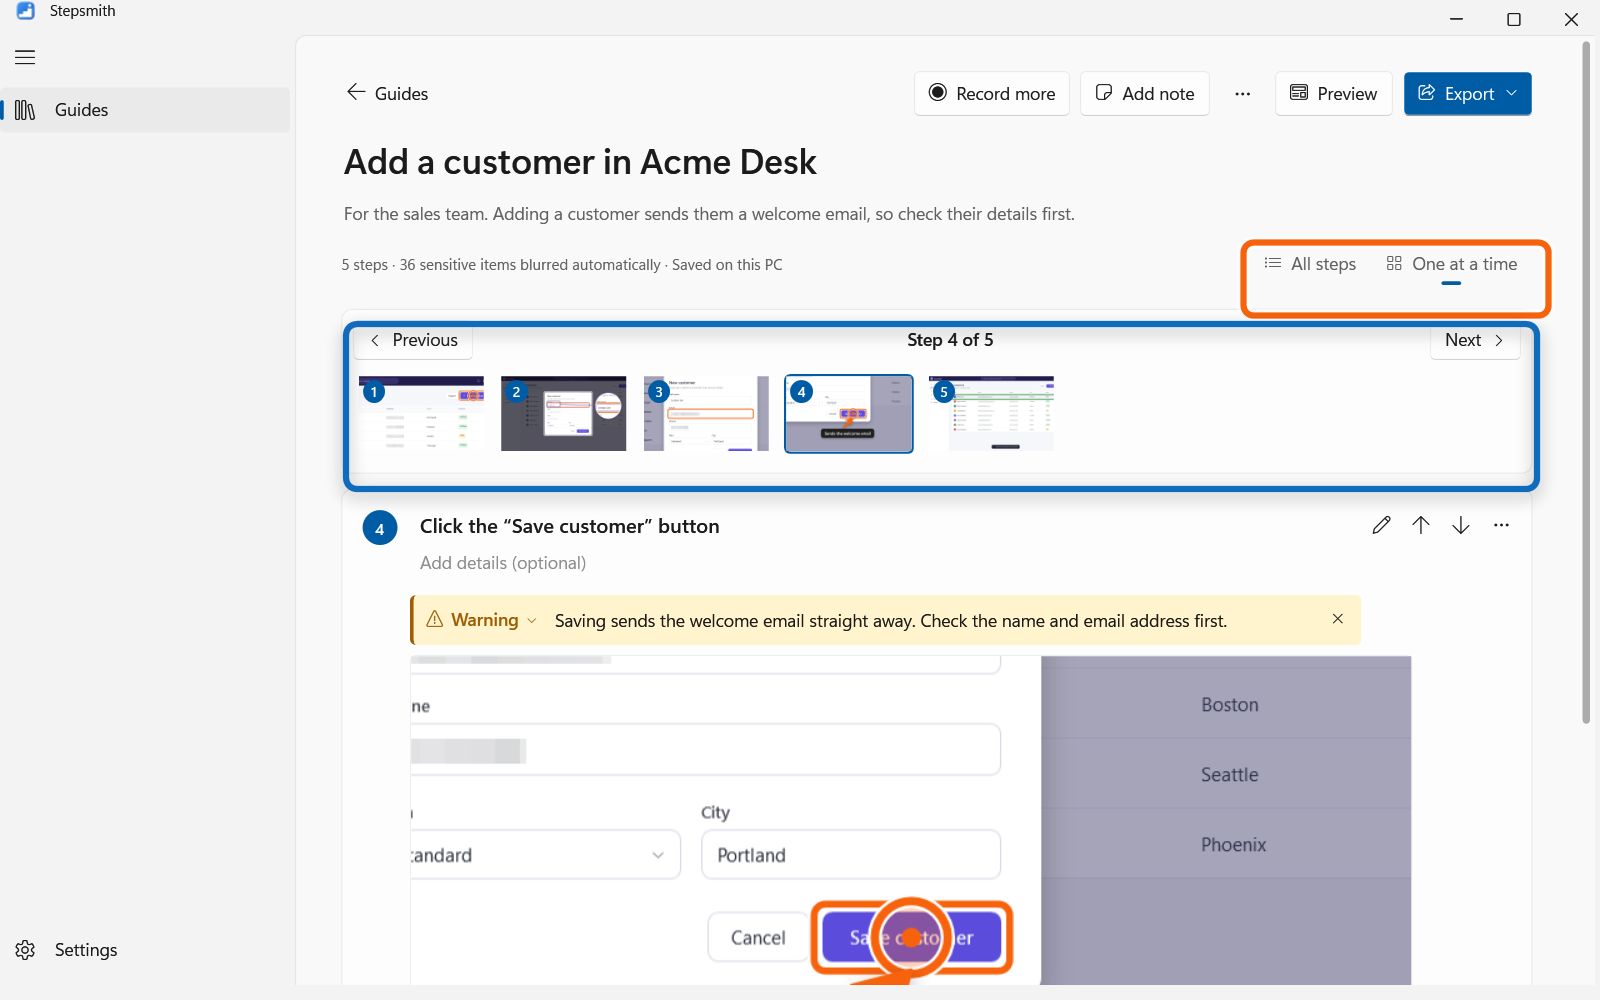
Switch to One at a time to work through a long guide step by step, with a larger screenshot. Use Previous and Next, click a thumbnail, or press Ctrl+Page Up and Ctrl+Page Down.
In any view, Page Up and Page Down scroll a screen at a time, and Ctrl+Home and Ctrl+End jump to the top or bottom.
- 12
Preview the guide before you export
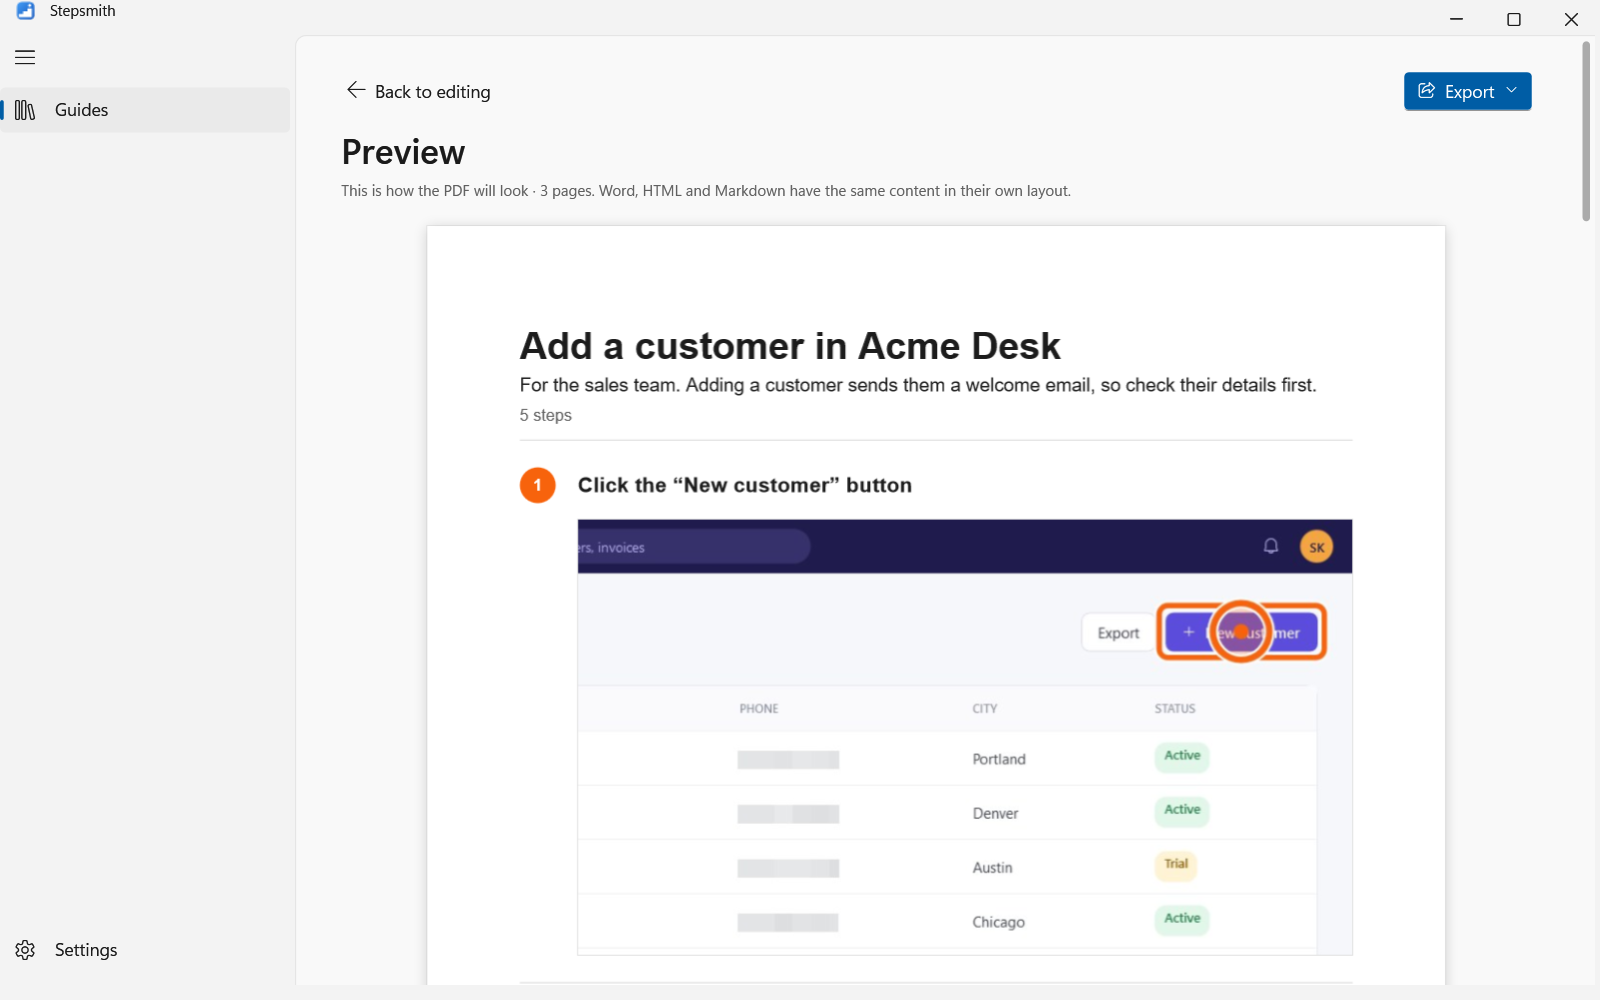
Preview shows every page exactly as the PDF will look, including any watermark, header and footer. Export straight from the preview, or press Esc to go back to where you were in the editor.
- 13
Export to PDF, Word, HTML or Markdown
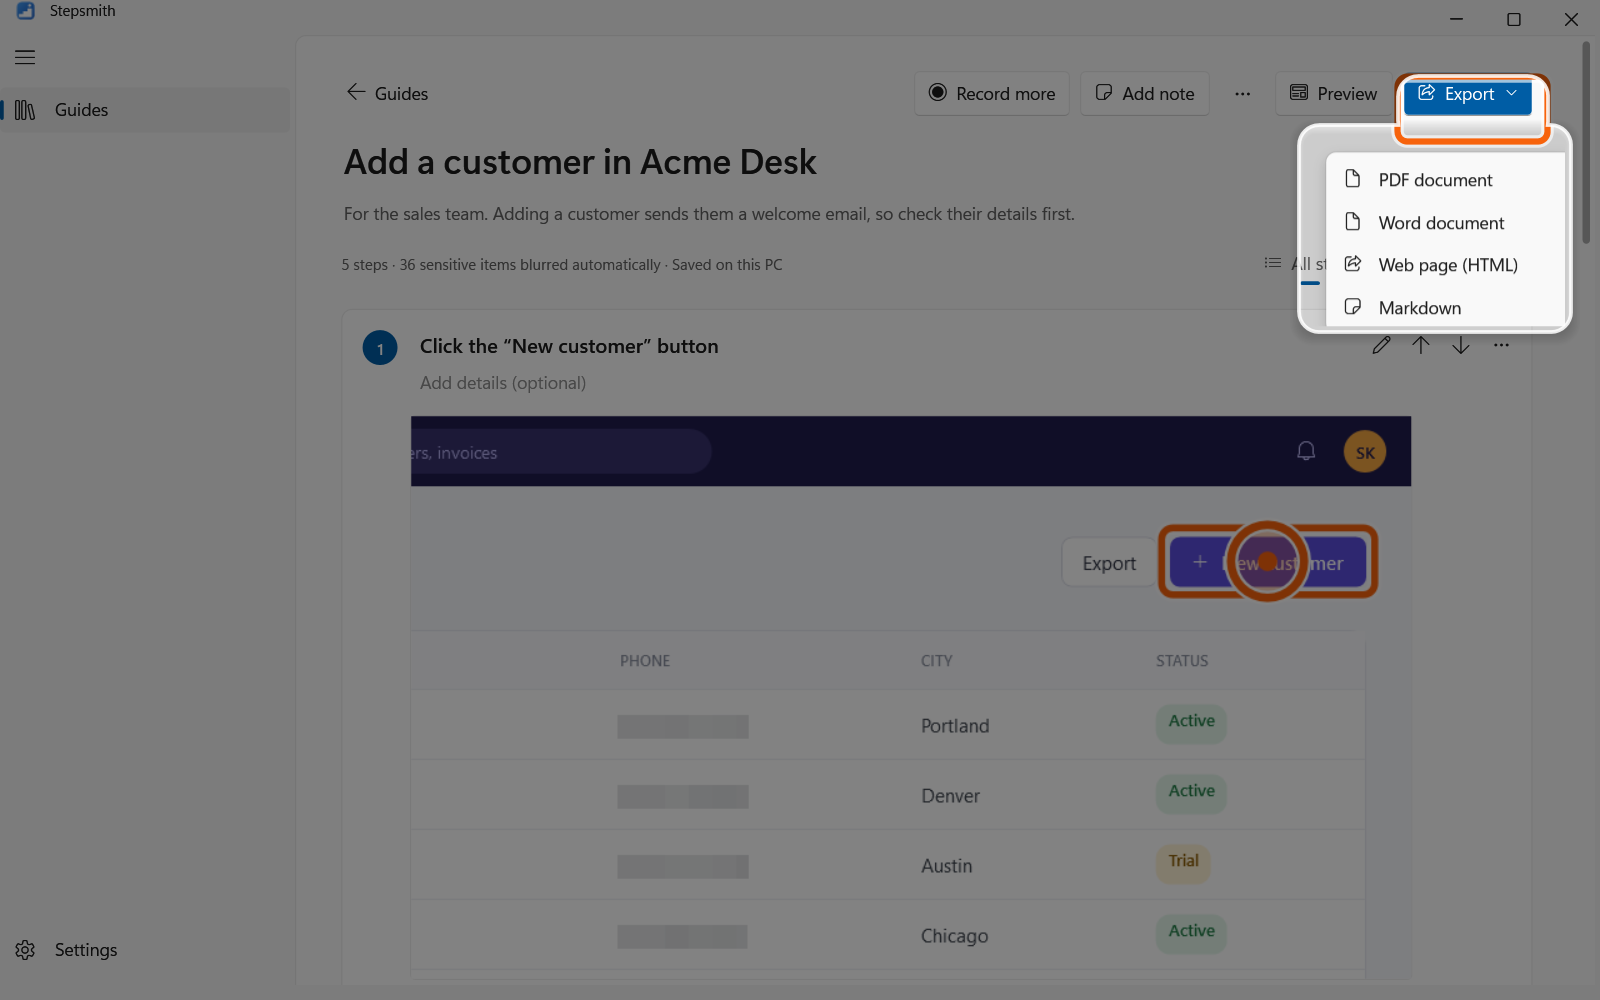
Choose a format from Export:
- PDF: numbered steps with selectable text and page numbers, each step kept together with its screenshot
- Word: real headings and styles, including Tip, Info and Warning, ready for your own template
- Web page: a single file with the images inside, which opens anywhere
- Markdown: a file and an images folder, for wikis and Git repositories
Info
The free edition adds a small “Made with Stepsmith” line at the end of exports.
- 14
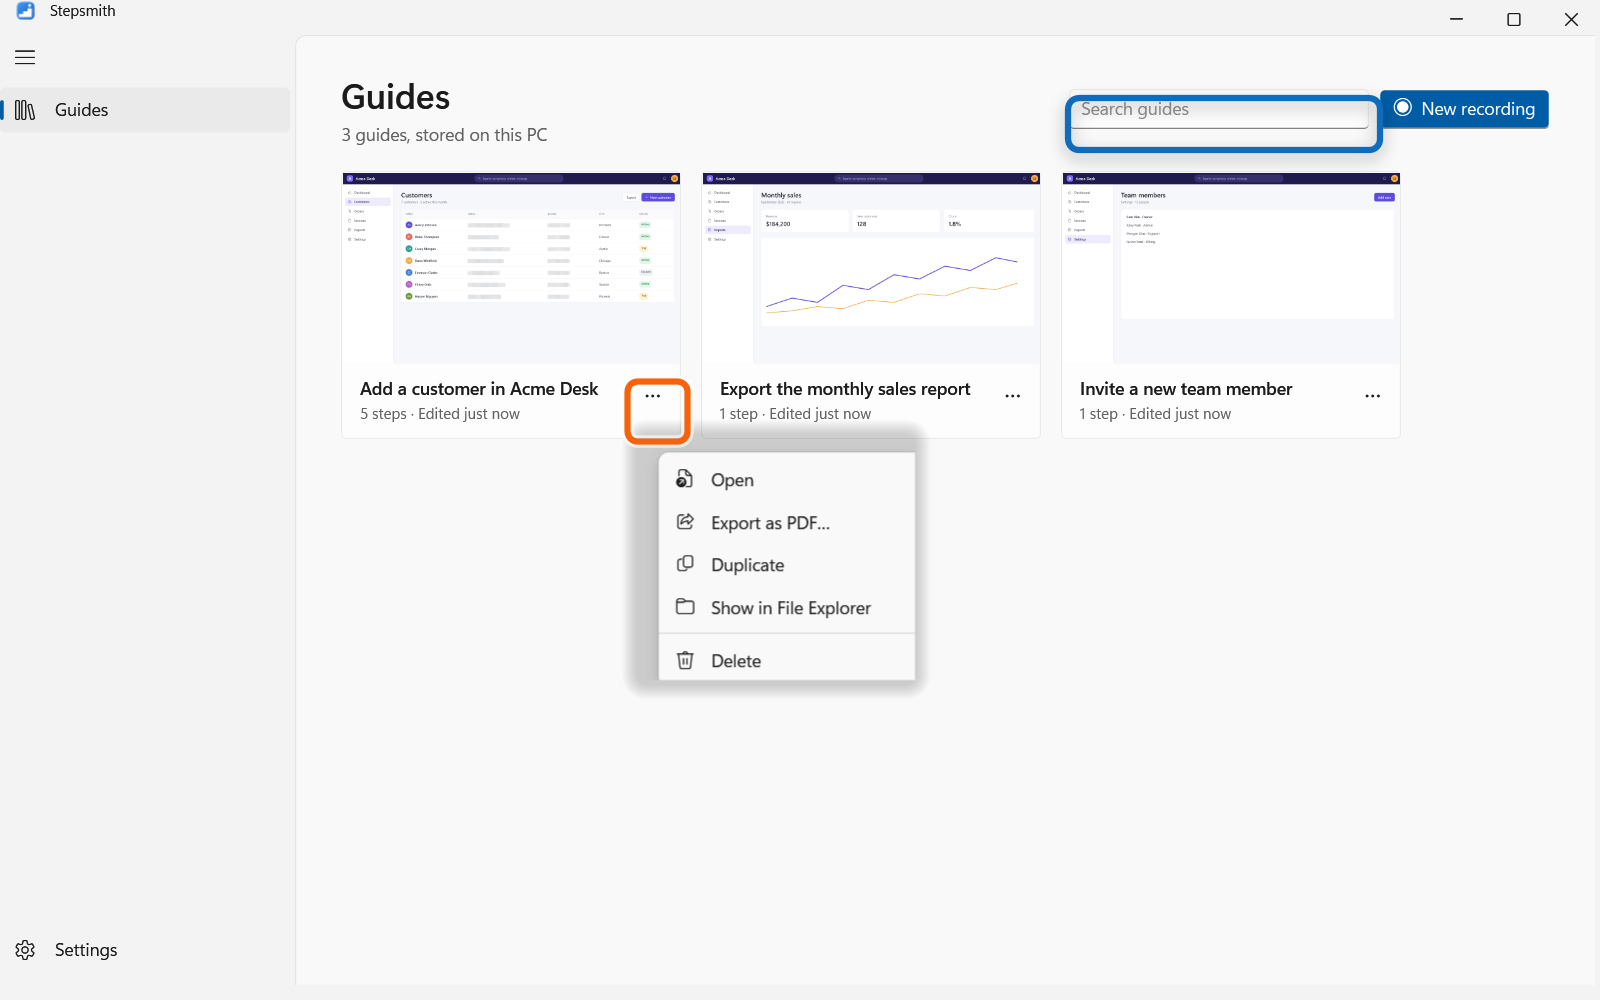
Find and manage your guides
All your guides are on the Guides page, most recent first. Search by title, click a guide to open it, or use its ··· button to duplicate it, export it as a PDF, show it in File Explorer, or delete it. Deleted guides go to the Recycle Bin.
Guides are ordinary files in a folder you choose, so you can back them up or share them like any other files.
- 15
Choose how Stepsmith records
In Settings you can choose:
- whether to capture the window you click (cleaner guides) or the whole screen
- whether typing and keyboard shortcuts are recorded
- whether to zoom in on what you click, and whether Stepsmith minimizes while recording
- automatic blurring, where your guides are stored, and the light or dark theme
- 16
Pro: trace every copy of a guide
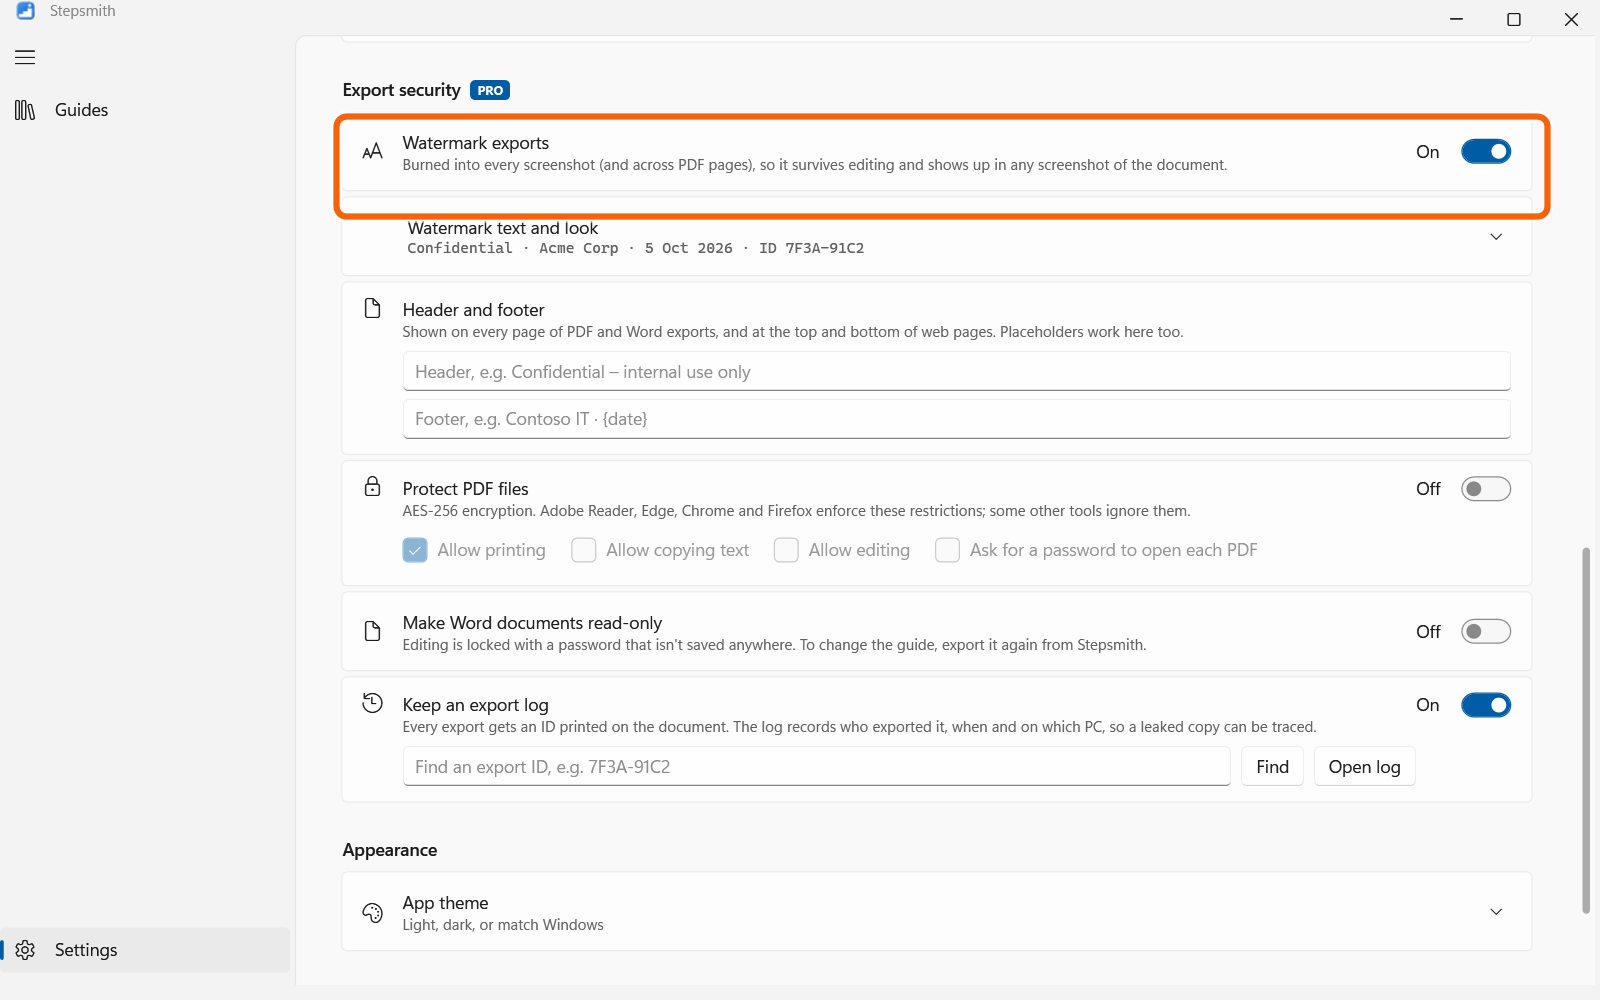
Stepsmith Pro is for teams that share guides of internal systems:
- A watermark with who exported the guide, and when, burned into every screenshot
- A unique export ID on every page, and an export log to look it up if a guide leaks
- A header and footer, such as Confidential, on every page
- Password-protected PDFs and read-only Word documents
- No “Made with Stepsmith” line
Start a free 14-day trial from Settings. No account or sign-up is needed.
- 17
Keyboard shortcuts
Recording
- Ctrl+Shift+F8: capture a step without clicking
- Ctrl+Shift+F9: pause or resume
- Ctrl+Shift+F10: finish
Editor
- Page Up and Page Down: scroll a screen at a time
- Ctrl+Home and Ctrl+End: top or bottom
- Ctrl+Page Up and Ctrl+Page Down: previous or next step, one at a time
- Ctrl+Enter: accept a tip, info or warning
Screenshot viewer
- Ctrl+mouse wheel, Ctrl+plus, Ctrl+minus: zoom
- Ctrl+0: fit the window · Ctrl+1: actual size
- Left and Right arrow keys, or Page Up and Page Down: other steps
- Esc: close
Annotating
- V, A, R, E, H, S, M, T, N: tools · 1, 2, 3: sizes
- Shift: square boxes, straight arrows · Ctrl+D: duplicate
- Delete: remove · Ctrl+Z: undo · Space and drag: move around
- 18
You're ready
Record your first guide with New recording on the Guides page.
This welcome guide is an ordinary guide: export it, change it, or delete it. You can add it back any time from Settings, under About.
Tip
Try it now: export this guide as a PDF to see what your readers will get.
Ready to make your own?
Start free with every export format, or try Pro free for 14 days.
Buy Stepsmith Pro